

Border Styles

Single Line Border

Double Line Border
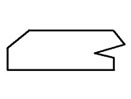
Bevel Edge Border
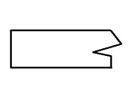
Straight Edge Border
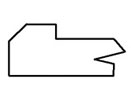
Single Line Bevel Edge Border
Types of Mounting
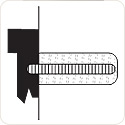
Concealed Mounting with Lugs
Lugs (extra pads) are cast onto the back of the plaque. These are drilled and tapped to accept a threaded rod.
Recommended Uses: Any type of brick, masonry or stone wall or surface.
Installation: Drill holes in the mounting surface slightly larger than the diameter of the lugs. Fill the mounting hole with quickset cement, silicone or epoxy. Set the plaque in place and allow the adhesive to set.
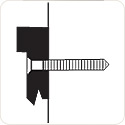
Concealed Mounting Drill & Tap Back of Plaque
The back of the plaque is drilled and tapped to accept a threaded rod.
Recommended Uses: Any type of brick, masonry or stone wall or surface.
Installation: Drill holes in the mounting surface slightly larger than the diameter of the threaded rods. Fill the mounting hole with quickset cement, silicone or epoxy. Set the plaque in place and allow the adhesive to set.
Rosettes & Toggle Bolts

Holes are drilled through the face of the plaque for toggle bolts. Toggle bolts are threaded machine screws 4″ to 6″ long with spring-loaded butterflies that fold up and pass through the holes in the wall.
Recommended Uses: For hollow tile, cement block, drywall or wood paneling over stud construction.
Installation: Using the plaque holes as a template, drill holes through the wall large enough to allow the butterfly assembly to pass through the hole. Insert each machine screw through the plaque and screw on each butterfly. Fold the Butterfly assemblies so they may be inserted through the holes in the wall until the wings spring open inside the hollow wall. Pull back on each screw head to press the butterfly against the inside wall. Turn the machine screws until they are secure. If rosette covers are provided, screw the rosettes into the toggle bolt heads.
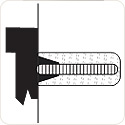
Rosettes, Machine Screws and Expansion Sleeves

Holes are drilled through the face of the bronze plaque for machine screws. Each expansion sleeve (lead anchor) has a threaded interior to house a machine screw. The lead anchor will expand when a screw is inserted and tightened.
Recommended Uses: Brick wall, stone wall, cement block, drywall or wood paneling over stud construction.
Installation: Using the plaque holes as a template, drill holes through the wall large enough to accept the lead anchor. Drill the holes deeply enough so the fully driven screw will not strike the back of the hole. Insert the expansion sleeves into the holes threaded ends first. Insert the machine screws through the plaque and tighten the screws into the expansion sleeves. If rosette covers are provided, screw rosettes into the machine screw heads.
Wood Screws
Holes are drilled through the plaque and to accept a wood screw. For larger plaques the screws may be drilled and tapped to accept a rosette cover.
Recommended Uses: Wood walls, and plaster walls (small plaques only).
Using plaque holes as a template, drill holes in the wall. Insert the wood screws through the plaque holes and tighten the screws. If rosette covers are provided screw the rosettes into the wood screw head.
Free standing postmounts
Stake Mount #384

Machine screws go through a 3/8” thick stake into the back of the plaque. The maximum plaque size for this type of mounting is 12” x 8”. Stake is painted the same colour as your plaque.
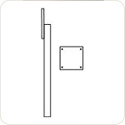
Small Post Mount #245

Machine screws go through a 4” x 4” x .125” steel plate into the back of the plaque which is attached to a 2” x 1” x .125” steel tube. The plaque mounts at a 45º angle. The following tube lengths are available: 48”, 60”, & 84”. Steel tubing and steel plate are painted the same colour as your plaque.
Small Post Mount 90º – #290
Machine screws go through a 4” x 4” x .125” steel plate into the back of the plaque which is attached to a 2” x 1” x .125” steel tube. The plaque mounts at a 90º angle. The following tube lengths are available: 48”, 60” & 84”. Steel tubing and steel plate are painted the same colour as your plaque.
Large Post Mount 45º – #445

Machine screws go through a 14” x 14” x .125” steel plate into the back of the plaque which is attached to a 4” x 2” x .125” steel tube. The plaque mounts at a 45º angle. The tube length is 84”. Steel tubing and steel plate are painted the same colour as your plaque.
Large Post Mount 90º – #490

Machine screws go through a 14” x 14” x .125” steel plate into the back of the plaque which is attached to a 4” x 2” x .125” steel tube. The plaque mounts at a 90º angle. The tube length is 84”. Steel tubing and steel plate are painted the same colour as your plaque.
General Information
Taxes
HST extra.
Shipping
All prices are FOB New Hamburg, Ontario. We can ship collect or prepay and charge the shipping to your invoice.
Installation
Mounting hardware will be included with the plaque based on type of wall or place of attachment advised when ordered but the actual installation is the responsibility of the purchaser.
Payment Terms
Visa, Mastercard payments accepted. Net 30 day terms may be made available upon approval of credit application by Accounting Department.
Layouts for approval
Computer generated layouts are provided upon receipt of your order. If changes or adjustments are required we will re-submit a revised layout. The confirmed and signed layout must be returned for us to begin production. Changes made after layout approval may incur additional charges